Flashing Arduino firmware (Part 2)
In the first part of this series I explained what software and hardware you will need to get started with flashing your Arduino board so that it can emulate other devices. In this post I’ll show you how to do it. Please note that while I’ve done this many times successfully, there is always the chance that something may go wrong. I am willing to help but I can take no responsibility if the steps below render your Arduino board unusable.
At the end of the post you will find a list of sources I followed to compile the information for this series.
What will happen?
There are two Atmel chips on the Arduino board: one controls the communication to the computer while the other runs your code (Atmega16U2 and Atmega328P, respectively, on the board that I am using). To emulate a USB device the 16U2 needs to be configured to identify itself as the desired device and this is achieved by flashing it with firmware which is similar to what is written to the Arduino board when you upload your Sketch.
The larger (328P in my case) chip will handle all the logic and reading of inputs while the 16U2 will pass these inputs to the computer as the device it emulates, a keyboard for example.
Development flow
To develop new functionality for your USB device you will have to alter your development flow to account for the flashing of the 16U2. Whereas the normal development steps when working with an Arduino are:
- Write sketch
- Compile
- Upload
- Run
when your Arduino is emulating a USB device the steps become:
- Write sketch
- Compile
- Upload
- Reset 16U2 (put in Device Firmware Update (DFU) mode)
- Flash device firmware
- Disconnect and reconnect
The last three steps are also used to recover the Arduino so that you can upload more sketches to it:
- Put device in DFU mode
- Flash Arduino firmware
- Disconnect and reconnect
DFU mode
You will need:
- Arduino board
- Header jumper (or wire to connect between two headers)
- USB cable
- Atmel FLIP USB drivers (if on Windows)
To enter DFU mode:
- Connect the board to the computer and make sure it is on
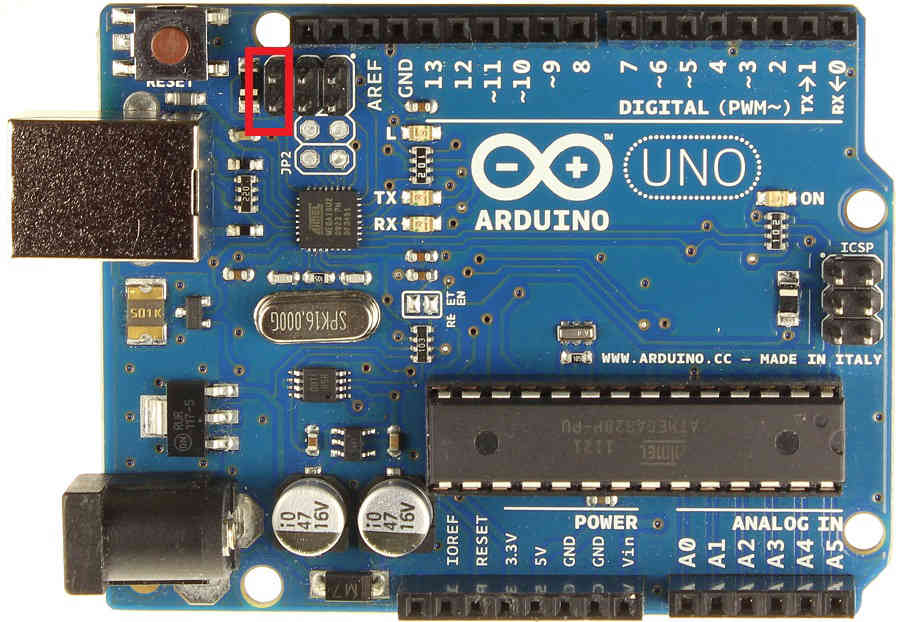
- With the header jumpers or wire, connect the two headers closest to the USB cable (in red below) and keep connected for one second then remove the jumper. The board will flash and the Arduino COM port will disappear from the Arduino IDE. To recover at this point simply disconnect and reconnect the USB cable to power cycle the Arduino.
You are now in DFU mode. You will not be able to upload sketches to your Arduino any more at this point. To be able to communicate with the Atmega16U2 chip you have to install some drivers. To do this in a Windows environment follow the steps below.
- Open Device Manager on Windows and search for an unkown device.
- Right click the device and select “Update Drive Software…”
- Select “Browse my computer for driver software”
- Navigate to the usb folder in the Atmel FLIP installation folder (C:\Program Files (x86)\Atmel\Flip 3.4.7\usb normally)
- Select the file “atmel_usb_dfu.inf” to be installed
You are now ready to flash the Atmega’s firmware.
Flashing the firmware
As a test, and to show you how to make your Arduino usable as an Arduino again we will first upload the official Arduino firmware. You will need all of the above plus
- Atmel FLIP software
- Arduino firmware (in the first example I am using the file Arduino-usbserial-atmega16u2-Uno-Rev3.hex from the Arduino github)
With the Arduino in DFU mode and the drivers installed:
- Start the Atmel FLIP software. You will be presented with the window below.

- Load the HEX file you wish to use by going to “File -> Load HEX file”.
- Select the target device by going to “Device -> Select…” and choosing the model of chip, Atmega16U2 in my case.
- Connect to the board by going to “Settings -> Communication -> USB” then selecting “Open”. The options in the Atmel FLIP window will now be enabled and you are ready to upload the firmware.

- Click on “Run” and wait for the firmware to be loaded. The circles next to the options checked will turn green.
- At this point you can either disconnect and reconnect the board the the computer (power cycle it) or click on “Start Application” with the “Reset” option checked.
If you chose the Arduino firmware you will see the COM port reappear in device manager. If you’ve loaded another device’s firmware look for that device in device manager. If you run into any problems, double check that the device is in DFU mode or that you’ve selected the appropriate target device in FLIP.
Leave your comments and questions below and I hope you enjoyed this tutorial!
References
To write this series I referred to the follow sites:
- Arduino Hacking (firmware for USB HID devices)
- Mitch Tech Arduino USB keyboard
- Lightweight USB Framework for AVR (LUFA)
- Updating the Atmega8U2 and 16U2 on an Uno or Mega2560 using DFU
- Arduino Uno as a USB HID Interface